

Table of Contents
- Why Jersey Lettering Peels: Common Causes
- Tools and Materials You'll Need for Jersey Repair
- How to Iron On Jersey Numbers Without Damage
- Step-by-Step Guide to Reattach Peeling Vinyl Lettering
- How to Wash Sports Jerseys to Protect Lettering
- Preventing Future Peeling: Long-Term Jersey Maintenance
- When to Seek Professional Repair or Replacement
- Frequently Asked Questions
Last Updated: September 25, 2026
Why Jersey Lettering Peels: Common Causes
Understanding what causes jersey lettering peeling helps you prevent it.
Heat damage is the most common culprit. Hot dryer cycles weaken the adhesive bond, especially on synthetic fabrics like polyester with low melting points.
Washing mistakes accelerate peeling. Hot water and harsh detergents degrade adhesive, and tumble drying creates stress on lettering edges.
Poor initial application leaves weak spots if heat transfer wasn't done correctly during manufacturing. Jersey quality matters from purchase.
Mechanical stress from regular wear compounds the problem. Repeated flexing pulls on vinyl lettering edges and causes peeling over time.
At TravelBallandmore, our modern printing techniques and quality materials mean your team's lettering stays bold and intact through entire seasons.
Tools and Materials You'll Need for Jersey Repair
Jersey repair tools vary by lettering type. Screen-printed, vinyl heat transfer, and embroidered patches each require different approaches.
For vinyl heat-transfer lettering (most common):
- Household iron with adjustable heat settings (250-300°F range)
- Parchment paper or Teflon-coated pressing sheet
- Ironing board or flat, heat-resistant surface
- Clean cotton cloth for cushioning
- Optional: fabric glue (thermoplastic-based) for reinforcing edges before heat application
For screen-printed lettering:
- Household iron (lower heat tolerance than vinyl)
- Parchment paper
- Fabric adhesive spray or textile glue (screen-printed ink bonds differently than vinyl and often requires chemical adhesive rather than heat alone)
- Small brush or applicator for precise glue placement
For embroidered patches:
- Needle and thread matching the jersey color (for hand-stitching loose edges)
- Fabric glue or fusible webbing (heat-activated adhesive sheets) for backing support
- Iron for activating fusible webbing if used
- Parchment paper to protect the iron plate
Universal supplies across all types:
- Measuring tape or ruler to assess damage extent
- Clean, damp cloth for removing dirt and debris before repair
- Flat wooden block or edge tool for applying even pressure without an iron
If original adhesive is completely degraded, use permanent fabric adhesive or heat-activated adhesive sheets (fusible webbing). Apply fabric glue in a thin layer, press for 30 seconds, and allow 24 hours to cure. Fusible webbing activates at 250-300°F and works well for vinyl with dead adhesive or embroidered patches needing backing.
A heat press applies more uniform pressure and temperature control than a household iron, reaching 350°F+ for longer-lasting repairs. For small peeling edges, a household iron with parchment paper is sufficient for home use.
How to Iron On Jersey Numbers Without Damage
Ironing jersey numbers requires applying enough heat to reactivate adhesive without damaging synthetic fabric.
Set your iron to 250-300°F to reactivate thermal bonding without melting synthetic materials.
Lay the jersey flat on your ironing board, smooth wrinkles, and center the peeling lettering.
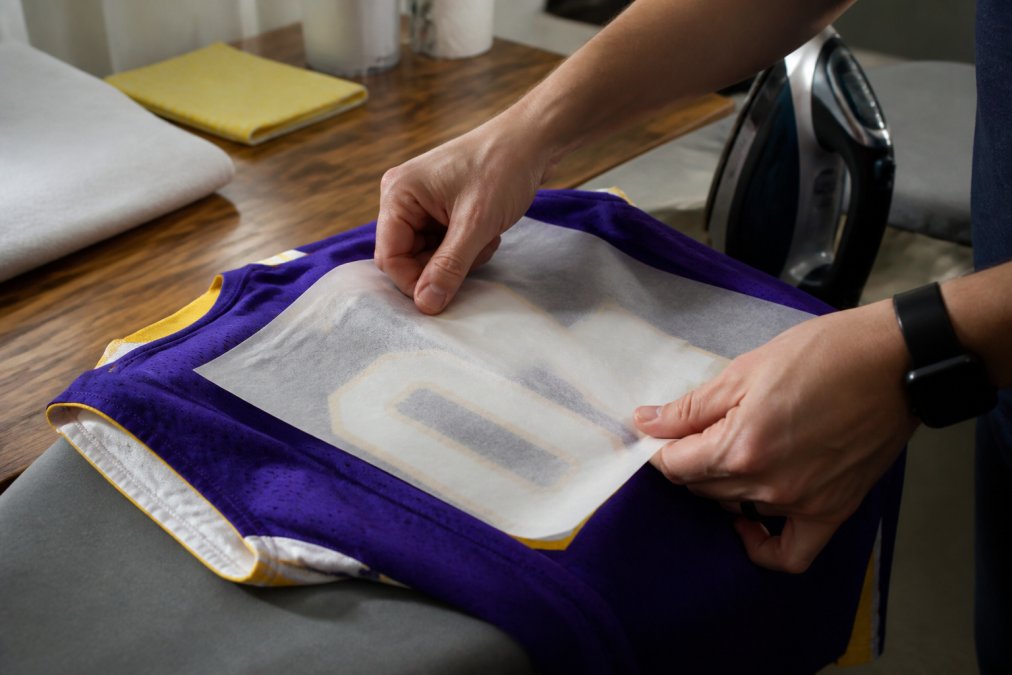
Place parchment paper over the peeling area to allow heat transfer while preventing direct iron-to-vinyl contact.
Press the iron down with consistent force for 15-30 seconds. Don't slide it, as this can shift the vinyl.
Let the area cool, then gently test the vinyl edge. If it still peels, repeat the process.
Avoid high heat, direct iron-to-vinyl contact, and excessive pressure.
Step-by-Step Guide to Reattach Peeling Vinyl Lettering
Step 1: Inspect the damage. Determine if peeling is at edges only or if large sections are separating.
Step 2: Clean the area. Use a damp cloth to remove dirt and debris, then dry completely.
Step 3: Set up your work station. Lay the jersey flat, smooth the fabric, and gather your iron, parchment paper, and cloth.
Step 4: Position parchment paper over the peeling section.
Step 5: Heat the area at 250-300°F with firm, steady pressure for 15-30 seconds.
Step 6: Cool and test. Wait 30-60 seconds, then gently test the vinyl edge.
Step 7: Repeat if necessary for stubborn peeling.
Step 8: Allow full cooling for 2-3 hours before wearing or washing.
How to Wash Sports Jerseys to Protect Lettering
Proper laundry care prevents jersey lettering peeling. Most damage occurs during washing and drying.
Wash in cold water. Hot water weakens the adhesive bond and shortens jersey life.
Turn jerseys inside out. This is the single most important washing step. When the jersey is inside out, the lettering faces inward and gets less direct friction from the washing machine. The fabric side takes the mechanical stress instead.
Use gentle detergent. Avoid harsh chemicals and heavy-duty detergents. These can degrade the adhesive over time. Choose a mild, sports-specific detergent if possible.
Select delicate wash cycle. Most washing machines have a delicate or gentle cycle. Use this instead of the regular cycle. The reduced agitation protects the vinyl lettering from unnecessary stress.
Skip the fabric softener. Fabric softener can interfere with the adhesive bond. It leaves a residue that weakens the connection between vinyl and fabric.
Air dry whenever possible. This is the best practice for jersey longevity. Hang the jersey in a well-ventilated area or lay it flat to dry. Avoid direct sunlight, which can fade colors and degrade the vinyl.
Use low heat if machine drying is necessary. If you must use a dryer, select the lowest heat setting or air-dry cycle. High heat is the primary cause of adhesive breakdown. Even one hot dryer cycle can cause peeling to start.
Preventing Future Peeling: Long-Term Jersey Maintenance
Stopping peeling before it starts requires consistent care habits. Small actions add up to dramatically longer jersey life.
Establish a washing routine. Wash jerseys within 24 hours of wearing them. Don't let sweat and dirt sit on the fabric. This prevents buildup that can weaken adhesive bonds.
Inspect lettering regularly. Check your jerseys every few weeks. Look for early signs of peeling at the edges. Catching problems early means a simple iron-on repair instead of replacing entire sections of lettering.
Store jerseys properly. Fold jerseys neatly in a cool, dry place.
When to Seek Professional Repair or Replacement
Knowing when a DIY repair will succeed, when it will fail, and how to troubleshoot a failed attempt saves money and prevents permanent damage to the jersey.
When home repair is likely to succeed:
- Peeling affects less than 25% of the lettering (edges only)
- The vinyl or lettering material is still intact and flexible
- The fabric underneath shows no scorching, melting, or tears
- The jersey is less than 5 years old (adhesive is likely still partially functional)
- Peeling is recent (within the last few months), not chronic
Salvaging a failed repair before professional escalation:
Before paying for professional service, try these steps:
-
Apply fabric adhesive as a secondary bond. If heat failed, use a permanent textile glue. Apply a thin layer to the back of the peeling section, press for 30 seconds, and allow 24 hours to cure. This often works for vinyl lettering with dead adhesive.
-
Use fusible webbing as reinforcement. Cut a piece of heat-activated adhesive sheet slightly smaller than the peeling area. Place it between the lettering and fabric, then iron at 250-300°F for 20 seconds. This creates a new bond layer without relying on the original adhesive.
-
Reinforce edges with hand-stitching. For embroidered patches or lettering with severely peeling edges, use a needle and thread to stitch around the perimeter. This prevents further peeling and buys time before professional repair.
When to seek professional repair:
- Large sections (more than 25%) of lettering are missing or severely damaged
- Multiple areas of the jersey have peeling problems
- The fabric underneath is torn, scorched, or melted
- DIY repairs have failed twice or more
- The jersey is a custom or special design with sentimental value
- The lettering is embroidered and requires re-stitching or patch replacement
When replacement makes more sense:
- The jersey is 5+ years old and showing multiple wear issues beyond lettering peeling
- Professional repair costs exceed 50% of a new jersey's price
- The lettering damage is so extensive that repair would look visibly patched
- The jersey no longer fits properly or is faded from repeated washing
- The original lettering style is no longer available (team redesigned)
Frequently Asked Questions
Why does jersey lettering peel off after washing?
Jersey lettering peels when the adhesive bond between vinyl or screen-printed lettering and the fabric weakens. This happens from heat exposure in dryers, repeated friction during washing, and using hot water. The melting point of synthetic adhesives is often lower than the temperatures used in standard laundry cycles. Delicate wash settings and air drying preserve the thermal bonding that holds lettering in place.
Can you fix jersey lettering that has already started to peel?
Yes, you can repair peeling vinyl on jerseys using heat activation and fabric glue. Clean the peeling edges, apply a textile adhesive designed for sportswear, then use a household iron on low heat with parchment paper as a protective layer. Apply firm pressure for 30-60 seconds. If the lettering is severely damaged or the repair fails after one attempt, professional re-application or jersey replacement may be more reliable.
What's the safest way to wash sports jerseys to prevent lettering damage?
Wash jerseys inside out on a delicate cycle with cold water, and air dry completely. Avoid the tumble dryer, which generates heat that damages adhesive bonds. Skip fabric softener and bleach. For screen-printed jerseys, turn them inside out to reduce friction. Wash with similar colors and avoid rough agitation. These practices maintain the thermal bonding and extend the life of both the lettering and the synthetic fabric.
How do I iron on jersey numbers without damaging the fabric?
Use a household iron on low heat setting with parchment paper as a protective layer between the iron and the namesets or vinyl lettering. Place the jersey on a padded ironing board, position the lettering, and apply steady pressure for 30-60 seconds without sliding the iron. Let the jersey cool completely before moving it. Low heat prevents scorching and melting while activating the adhesive for secure bonding.